
Go | New | Find | Notify | Tools | Reply |
Member |
I have done this before with no issues, I have watched every Youtube video there is on the subject and have the Chris's CD on it. No joy. I detail stripped the frame to have it redone in NP3, as the rest of the gun was already done in NP3. I cannot get this to work. I installed the SRT kit and the damned decocker isn't returning all the way. The plate behind it will not stay flush with the frame. And it only sometimes cocks, fires and decocks. I am at a total loss and standstill. WTF am I doing wrong?    Freewill Firearms 07 FFL, Class 2 SOT | ||
|
| Member |
Been a long time since I detail stripped mine. But I seem to remember the spring for the trigger bar goes in the open slot not the hole. davemercer | |||
|
| Freethinker |
Yes, the rear of the trigger bar spring should hook into the notch at the lower rear of the trigger bar, not into that oh-so-inviting hole that you have it in. I don’t know what’s going on with the decocking lever bearing, but it should be positioned flush into place inside the frame before attaching the spring. A trick is to put it into position and then insert a magazine to hold it there while attaching the lever and spring. I can’t understand, though, how the bearing could be that far out of position and still permit the spring to be installed. It almost seems like it’s the wrong part: Any chance of a mix-up between guns? And although it wouldn’t affect the decocking lever bearing, are you certain that the hammer strut is positioned properly against the hammer? A common mistake is to put the head of the strut too far forward. Otherwise I can only think that the SRT parts aren’t installed correctly. ► 6.0/94.0 “The fundamental cause of trouble in the world today is that the stupid are cocksure while the intelligent are full of doubt.” — Bertrand Russell | |||
|
| That's just the Flomax talking  |
Has the NP3 coating affected the fit of tight parts? Trigger bar spring location: 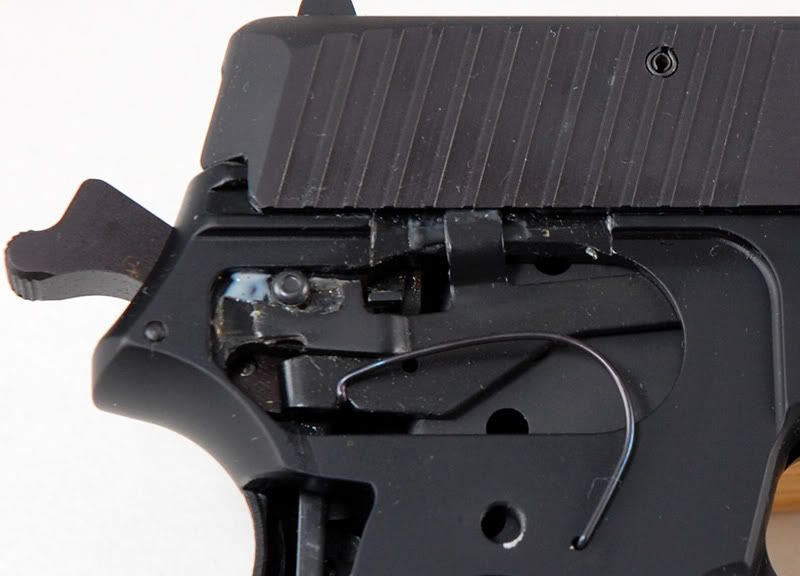 | |||
|
| Member |
The pin at the back of the trigger bar should stick out a little further to the right. | |||
|
| Member |
By Rick Lee:
If I remember correctly, there are different de-cocker levers. The sear determines which de-cocker lever should be used. If you just installed the SRT kit, you may need to get the right de-cocker lever. There is definitely something wrong in the de-cocker bushing area. Seems like the axle is too long. TBK | |||
|
| Member |
The decocking lever pivot post and plate only fit into the frame one way. It appears you have that part in upside down. the frame is machined with a slight step /indintention to hold the plate from turning. Make sure that the edge of the decocker plate rests on the ledge in the frame. +1 on the trigger bar spring placement Sigs, Glocks and a couple others | |||
|
| Member |
Can't see how the coating could effect the assembly of the trigger bar spring. Sigs, Glocks and a couple others | |||
|
| Member |
You are correct, if he purchased a kit from Sig the P220 kit comes with a new decocker lever, to replace the original. That can impact the reason the decocker doesn't work. But that lever shouldn't impact the position of the decocker pivot plate. Sigs, Glocks and a couple others | |||
|
| My other Sig is a Steyr.  |
The decocker pivot may need to be rotated. It fits inside the frame and looks like  but the one in the pic is rotated 180. but the one in the pic is rotated 180. | |||
|
| Member |
You get back together correctly. Sigs, Glocks and a couple others | |||
|
Oriental Redneck |
Two separate points Gary was making. 1- Refinishing has been known to affect the fitting of tight parts. You will run into problems, if the refinisher didn't do the job right. 2- Second point, he was just pointing out the common mistake (sticking it in the wrong hole in the OP's gun) when putting the TBS back. Q | |||
|
| Member |
Really good info here. I wish the OP would report back and explain what went wrong is his assembly. You guys nailed it though. | |||
|
| Powered by Social Strata |
| Please Wait. Your request is being processed... |
© SIGforum 2026